
GCP – Build data analytics agents faster with BigQuery’s fully managed, remote MCP server
Connecting AI agents to your enterprise data shouldn’t require complex custom integrations or weeks of development. With the release of fully managed, remote Model Context Protocol (MCP) servers for Google services last month, you can now use BigQuery MCP server to give your AI agents a direct, secure, way to analyze data. This fully managed MCP server removes management overhead, enabling you to focus on developing intelligent agents.
MCP server support for BigQuery is also available via the open source MCP Toolbox for Databases, designed for those seeking more flexibility and control over the servers. In this blog post, we discuss and demonstrate the integrations of newly released fully managed, remote BigQuery Server, which is in preview as of January 2026.
Remote MCP servers run on the service’s infrastructure and offer an HTTP endpoint to AI applications. This enables communication between the AI MCP client and the MCP server using a defined standard.

MCP helps accelerate the AI agent building process by giving LLM-powered applications direct access to your analytics data through a defined set of tools. Integrating the BigQuery MCP server with the ADK using the Google OAuth authentication method can be straightforward, as you can see below with our discussion of Agent Development Kit (ADK) and Gemini CLI. Platforms and frameworks such as LangGraph, Claude code, Cursor IDE, or other MCP clients can also be integrated without significant effort.
Let’s get started.
Use BigQuery MCP server with ADK
To build a BigQuery Agent prototype with ADK, follow a six-step process:
-
Prerequisites: Set up the project, necessary settings, and environment.
-
Configuration: Enable MCP and required APIs.
-
Load a sample dataset.
-
Create an OAuth Client.
-
Create a Gemini API Key.
-
Create and test agents.
IMPORTANT: When planning for a production deployment or using AI agents with real data, ensure adherence to AI security and safety and stability guidelines.
Step 1: Prerequisites > Configuration and environment
1.1 Set up a Cloud Project
Create or use existing Google Cloud Project with billing enabled.
1.2 User roles
Ensure your user account has the following permissions to the project:
-
roles/bigquery.user (for running queries)
-
roles/bigquery.dataViewer (for accessing data)
-
roles/mcp.toolUser (for accessing MCP tools)
-
roles/serviceusage.serviceUsageAdmin (for enabling apis)
-
roles/iam.oauthClientViewer (oAuth)
-
roles/iam.serviceAccountViewer (oAuth)
-
roles/oauthconfig.editor (oAuth)
1.3 Set up environment
Use MacOS or Linux Terminal with the gcloud CLI installed.
In the shell, run the following command with your Cloud PROJECT_ID and authenticate to your Google Cloud account; this is required to enable ADK to access BigQuery.
- code_block
- <ListValue: [StructValue([(‘code’, ‘# Set your cloud project id in env variablernBIGQUERY_PROJECT=PROJECT_IDrnrngcloud config set project ${BIGQUERY_PROJECT}rngcloud auth application-default login’), (‘language’, ”), (‘caption’, <wagtail.rich_text.RichText object at 0x7f218b1ddf40>)])]>
Follow the prompts to complete the authentication process.
Step 2: Configuration > User roles and APIs
2.1 Enable BigQuery and MCP APIs
Run the following command to enable the BigQuery APIs and the MCP APIs.
- code_block
- <ListValue: [StructValue([(‘code’, ‘gcloud services enable bigquery.googleapis.com –project=${BIGQUERY_PROJECT}rngcloud beta services mcp enable bigquery.googleapis.com –project=${BIGQUERY_PROJECT}’), (‘language’, ”), (‘caption’, <wagtail.rich_text.RichText object at 0x7f218b1ddcd0>)])]>
Step 3: Load sample dataset > cymbal_pets dataset
3.1 Create cymbal_pets dataset
For this demo, let’s use the cymbal_pets dataset. Run the following command to load the cymbal_pets database from the public storage bucket:
- code_block
- <ListValue: [StructValue([(‘code’, ‘# Create the dataset if it doesn’t exist (pick a location of your choice)rn# You can add –default_table_expiration to auto expire tables.rnbq –project_id=${BIGQUERY_PROJECT} mk -f –dataset –location=US cymbal_petsrnrn# Load the datarnfor table in products customers orders order_items; do rnbq –project_id=${BIGQUERY_PROJECT} query –nouse_legacy_sql \rn “LOAD DATA OVERWRITE cymbal_pets.${table} FROM FILES(rn format = ‘avro’,rn uris = [ ‘gs://sample-data-and-media/cymbal-pets/tables/${table}/*.avro’]);”rndone’), (‘language’, ”), (‘caption’, <wagtail.rich_text.RichText object at 0x7f218b1ddb20>)])]>
Step 4: Create OAuth Client ID
4.1 Create OAuth Client ID
We will be using Google OAuth to connect to the BigQuery MCP server.
7. In the Google Cloud console, go to Google Auth Platform > Clients > Create client
-
-
*Select Application type value as “Desktop app”.
-
Once client is created, make sure to copy the Client ID and Secret and keep it safe.
-
Optional: If you used a different project for OAuth client, run this with your CLIENT_ID_PROJECT
- code_block
- <ListValue: [StructValue([(‘code’, ‘gcloud beta services mcp enable bigquery.googleapis.com –project=CLIENT_ID_PROJECT’), (‘language’, ”), (‘caption’, <wagtail.rich_text.RichText object at 0x7f218b1dd850>)])]>
Note [for Cloud Shell Users only]: If you are using Google Cloud Shell or any hosting environment other than localhost, you must create a “Web application” OAuth Client ID.
For a Cloud Shell environment:
- For “Authorized JavaScript origins” value use output of this command:
echo "https://8000-$WEB_HOST" - For “Authorized redirect URIs” value use output of this command:
echo "https://8000-$WEB_HOST/dev-ui/"
(URIs in Cloud Shell are temporary and expire after the current session)
Note: If you decide to use a web server, then you will need to use the “Web Application” type OAuth Client and fill in the appropriate domain and redirect URIs.
Step 5: API Key for Gemini
5.1 Create API Key for Gemini
Create a Gemini API key at API Keys page. We will need a generated key to access the Gemini model using ADK.
Step 6: Create ADK web application
6.1 Install ADK
To install ADK and initiate an agent project, follow the instructions outlined in the Python Quickstart for ADK.
6.2 Create a new ADK Agent
Now, create a new agent for our BigQuery remote MCP server integration.
- code_block
- <ListValue: [StructValue([(‘code’, ‘adk create cymbal_pets_analystrnrn#When prompted, choose the following:rn#2. Other models (fill later)’), (‘language’, ”), (‘caption’, <wagtail.rich_text.RichText object at 0x7f218b1dd8e0>)])]>
6.3 Configure the env file
Run following common to update the cymbal_pets_analyst/.env file, with the below list of variables and their actual values.
- code_block
- <ListValue: [StructValue([(‘code’, ‘cat >> cymbal_pets_analyst/.env <<EOFrnGOOGLE_GENAI_USE_VERTEXAI=FALSErnGOOGLE_CLOUD_PROJECT=BIGQUERY_PROJECTrnGOOGLE_CLOUD_LOCATION=REGIONrnGOOGLE_API_KEY=AI_STUDIO_API_KEYrnOAUTH_CLIENT_ID=YOUR_CLIENT_IDrnOAUTH_CLIENT_SECRET=YOUR_CLIENT_SECRETrnEOF’), (‘language’, ”), (‘caption’, <wagtail.rich_text.RichText object at 0x7f218b1dd430>)])]>
6.4 Update the agent code
Edit the cymbal_pets_analyst/agent.py file, replace file content with the following code.
- code_block
- <ListValue: [StructValue([(‘code’, ‘import osrnfrom google.adk.agents.llm_agent import Agentrnfrom google.adk.tools.mcp_tool import McpToolsetrnfrom google.adk.tools.mcp_tool.mcp_session_manager import StreamableHTTPConnectionParamsrnfrom google.adk.auth.auth_credential import AuthCredential, AuthCredentialTypesrnfrom google.adk.auth import OAuth2Authrnfrom fastapi.openapi.models import OAuth2rnfrom fastapi.openapi.models import OAuthFlowAuthorizationCodernfrom fastapi.openapi.models import OAuthFlowsrnfrom google.adk.auth import AuthCredentialrnfrom google.adk.auth import AuthCredentialTypesrnfrom google.adk.auth import OAuth2Authrnrndef get_oauth2_mcp_tool():rn auth_scheme = OAuth2(rn flows=OAuthFlows(rn authorizationCode=OAuthFlowAuthorizationCode(rn authorizationUrl=”https://accounts.google.com/o/oauth2/auth”,rn tokenUrl=”https://oauth2.googleapis.com/token”,rn scopes={rn “https://www.googleapis.com/auth/bigquery”: “bigquery”rn },rn )rn )rn )rn auth_credential = AuthCredential(rn auth_type=AuthCredentialTypes.OAUTH2,rn oauth2=OAuth2Auth(rn client_id=os.environ.get(‘OAUTH_CLIENT_ID’, ”),rn client_secret=os.environ.get(‘OAUTH_CLIENT_SECRET’, ”)rn ),rn )rnrn bigquery_mcp_tool_oauth = McpToolset(rn connection_params=StreamableHTTPConnectionParams(rn url=’https://bigquery.googleapis.com/mcp’),rn auth_credential=auth_credential,rn auth_scheme=auth_scheme,rn )rn return bigquery_mcp_tool_oauthrnrnrnroot_agent = Agent(rn model=’gemini-3-pro-preview’,rn name=’root_agent’,rn description=’Analyst to answer all questions related to cymbal pets store.’,rn instruction=’Answer user questions, use the bigquery_mcp tool to query the cymbal pets database and run queries.’,rn tools=[get_oauth2_mcp_tool()],rn)’), (‘language’, ”), (‘caption’, <wagtail.rich_text.RichText object at 0x7f218c1e32e0>)])]>
6.5 Run the ADK application
Run this command from the parent directory that contains cymbal_pets_analyst folder.
- code_block
- <ListValue: [StructValue([(‘code’, ‘adk web –port 8000 .’), (‘language’, ”), (‘caption’, <wagtail.rich_text.RichText object at 0x7f218c1e3730>)])]>
Launch the browser, point to http://127.0.0.1:8000/ or the host where you are running ADK, and select your agent name from the dropdown. You now have your personal agent to answer questions about the cymbal pets data. When the agent connects to the MCP server, it will initiate the OAuth flow and you will be able to grant permissions to access.
As you can notice in the second prompt, you no longer need to specify the project id. This is because the agent can infer this information from the conversation.

Here are some questions you can ask:
-
What datasets are in my_project?
-
What tables are in the cymbal_pets dataset?
-
Get the schema of the table customers in cymbal_pets dataset
-
Find the top 3 orders by volume in the last 3 months for the cymbal pet store in the US west region. Identify the customer who placed the order and also their email id.
-
Can you get top 10 orders instead of the top one?
-
Which product sold the most in the last 6 months?
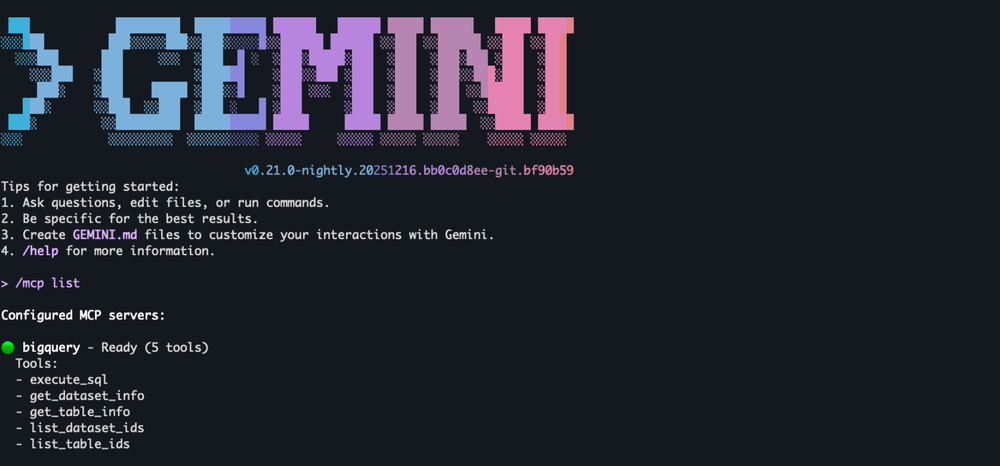
Use BigQuery MCP server with Gemini CLI
To use Gemini CLI, you can use the following configuration in your ~/.gemini/settings.json file. If you have an existing configuration, you will need to merge this under mcpServers field.
- code_block
- <ListValue: [StructValue([(‘code’, ‘{rn “mcpServers”: {rn “bigquery”: {rn “httpUrl”: “https://bigquery.googleapis.com/mcp”,rn “authProviderType”: “google_credentials”,rn “oauth”: {rn “scopes”: [rn “https://www.googleapis.com/auth/bigquery”rn ]rn }rn }rn }rn}’), (‘language’, ”), (‘caption’, <wagtail.rich_text.RichText object at 0x7f218c1e3e20>)])]>
Then run authenticate with gcloud.
- code_block
- <ListValue: [StructValue([(‘code’, ‘gcloud auth application-default login –clien-id-file YOUR_CLIENT_ID_FILE’), (‘language’, ”), (‘caption’, <wagtail.rich_text.RichText object at 0x7f218c1e3820>)])]>
Run Gemini CLI.
- code_block
- <ListValue: [StructValue([(‘code’, ‘gemini’), (‘language’, ”), (‘caption’, <wagtail.rich_text.RichText object at 0x7f218c1e3ca0>)])]>
BigQuery MCP server for your agents
You can integrate BigQuery tools into your development workflow and create intelligent data agents using LLMs and the BigQuery MCP server. Integration is based on a single, standard protocol compatible with all leading Agent development IDEs and frameworks. Of course, before you build agents for production or use them with real data, be sure to follow AI security and safety guidelines.
We are excited to see how you leverage BigQuery MCP server to develop data analytics generative AI applications.
Read More for the details.

