
GCP – Google Cloud and Spring AI 1.0
A big thank you to Fran Hinkelmann and Aaron Wanjala for their contributions and support in making this blog post happen.
After a period of intense development, Spring AI 1.0 has officially landed, bringing a robust and comprehensive solution for AI engineering right to your Java ecosystem. This isn’t just another library; it’s a strategic move to position Java and Spring at the forefront of the AI revolution.
With an overwhelming number of enterprises already running on Spring Boot, the path to integrating AI into existing business logic and data has never been smoother. Spring AI 1.0 empowers developers to seamlessly connect their applications with cutting-edge AI models, unlocking new possibilities without the typical integration headaches. Get ready to level up your JVM applications with intelligent capabilities!

Spring AI provides support for various AI models and technologies:
-
Image models can generate images from text prompts that are provided to them.
-
Transcription models can take audio files and convert them to text.
-
Embedding models can convert arbitrary data into vectors, which are data types that are optimized for semantic similarity search.
-
Chat models should be familiar! You’ve no doubt even had a brief conversation with one somewhere.
They’re versatile. You can get them to help you correct a document or write a poem or seemingly anything. They’re awesome, but they have some drawbacks.
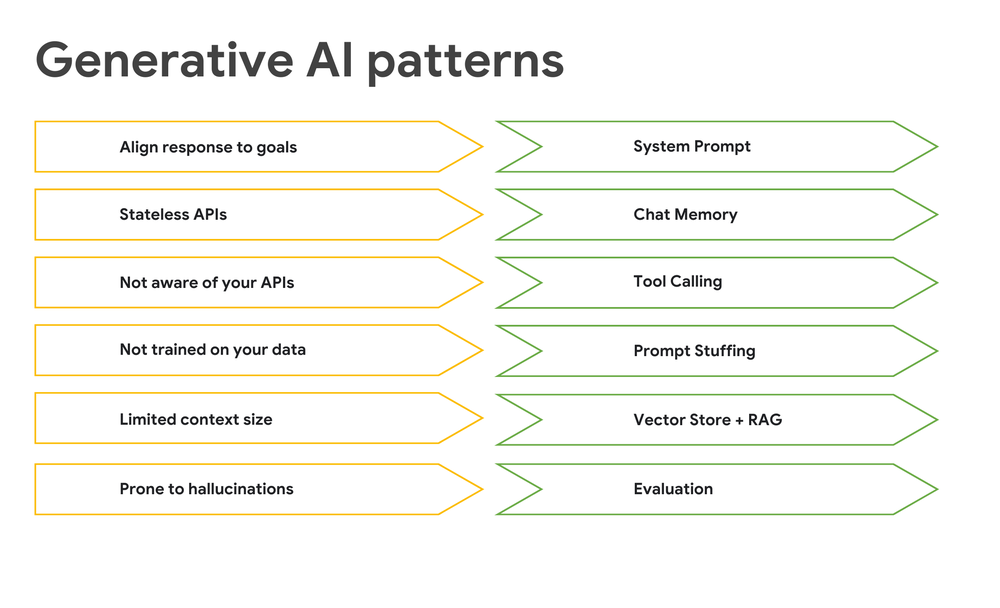
Chat models are open-minded and given to distraction. You can help manage the chat model by providing additional capabilities to do the following:
-
Keep chat models on track: use system prompts to define their behavior.
-
Give them a sense of memory: implement memory to track conversational context.
-
Let AI models access external functions: enable tool calling.
-
Provide relevant information directly in the request: use prompt stuffing for private data.
-
Fetch and utilize specific enterprise data: leverage vector stores for retrieval augmented generation (RAG).
-
Ensure accuracy: evaluation uses another model to validate outputs.
-
Let AI applications connect with other services: use the Model Context Protocol (MCP). MCP works regardless of the application’s programming language, so that you can build agentic workflows for complex tasks.
Spring AI integrates smoothly with Spring Boot, offering familiar abstractions and starter dependencies from the Spring Initializr, giving you the convention-over-configuration setup that you expect. You can easily connect your existing logic and data to AI models within Spring Boot applications.
With Spring AI, you can leverage robust solutions to make chat models more effective and to deeply integrate these models into larger systems.
Prerequisites
To make a call to a Gemini model in Vertex AI, you will need to obtain credentials for the service that you want to use and then configure your local development environment.
You start by setting up your Google Cloud environment:
-
In the Google Cloud console, create or select a Google Cloud project.
-
Ensure that Billing is enabled for your project. Generative AI models usually require a billed account.
-
In the console, enable the Vertex AI API.
-
In your terminal, install the gcloud CLI, which is essential for managing resources and setting up authentication for local development where you run your application.
-
Set up your application default credentials by running the following commands:
- code_block
- <ListValue: [StructValue([(‘code’, ‘# initialize gcloud rngcloud initrn# set the Project ID you have configuredrngcloud config set project <PROJECT_ID>rn# authenticate with your user accountrngcloud auth application-default login <ACCOUNT>’), (‘language’, ”), (‘caption’, <wagtail.rich_text.RichText object at 0x3ecd2e2bea60>)])]>
You’re in. Now you get to build.
The Build
You start by building a simple Google Cloud-optimized SpringAI application:
- Go to Spring Initializr.
- In the Artifact field, enter
google. - For the Project type, select Apache Maven (used in this blog) or Gradle.
- Click Add Dependencies, and then select these dependencies: Spring
Web, Spring Boot ActuatorActuator,GraalVM Native Support,Spring Data JDBC, Vertex AIGemini, Vertex AIEmbeddings,PGvector Vector Database,MCP Client, andDocker Compose Support. - Select the Java version that you want to use. We recommend that you use the latest available version. This blog uses GraalVM, which is a distribution of OpenJDK with some extra utilities that let you compile your code into images specific to the OS and architecture of the respective machine. These images operate in a fraction of the RAM and startup in a fraction of the time compared to regular JRE-based applications.
If you’re using sdkman.io, you can install it on your local machine by using the following command:
sdk install java 24-graalce -
Click
Generateand then save the.zipfile that you can open in your IDE.
Add the required dependencies
-
Extract the .zip file that you downloaded, and then open the
pom.xmlfile. -
In the
pom.xmlfile, at the end of the<dependencyManagement>, add the following lines:
- code_block
- <ListValue: [StructValue([(‘code’, ‘<dependency>rn<groupId>com.google.cloud</groupId>rn<artifactId>spring-cloud-gcp-dependencies</artifactId>rn <version>${spring-cloud-gcp.version}</version>rn <type>pom</type>rn<scope>import</scope>rn</dependency>rn<dependency>rn <groupId>com.google.cloud</groupId>rn <artifactId>libraries-bom</artifactId>rn <version>26.60.0</version>rn <type>pom</type>rn<scope>import</scope>rn</dependency>’), (‘language’, ”), (‘caption’, <wagtail.rich_text.RichText object at 0x3ecd2e2bef70>)])]>
Configuration
In the pom.xml file, you’ll need to update these configuration values, starting with the application.properties:
- code_block
- <ListValue: [StructValue([(‘code’, ‘# set application namernspring.application.name=googlernrn# configure actuators supported in the apprnmanagement.endpoints.web.exposure.include=*rnrn# docker compose configurationrnspring.docker.compose.lifecycle-management=start_onlyrnrn# configure the chat and embedding modelsrn# vertex embeddingrnspring.ai.vertex.ai.embedding.project-id=<your_user>rnspring.ai.vertex.ai.embedding.location=us-central1rn# vertex chatrnspring.ai.vertex.ai.gemini.project-id=<your_user>rnspring.ai.vertex.ai.gemini.location=us-central1rnspring.ai.vertex.ai.gemini.chat.options.model=gemini-2.5-pro-preview-05-06rnrn# initialize the schema in the vector storernspring.ai.vectorstore.pgvector.initialize-schema=truernrn# database connection parametersrnspring.datasource.password=secretrnspring.datasource.username=myuserrnspring.datasource.url=jdbc:PostgreSQL://localhost/mydatabase’), (‘language’, ”), (‘caption’, <wagtail.rich_text.RichText object at 0x3ecd2bb72580>)])]>
The following are more details about the sections that you updated:
-
configure actuators supported in the app: tells Spring Boot’s observability integration, the Spring Boot Actuator, to expose all Actuator endpoints. -
docker compose configuration: leverages the built-in Docker Compose support. Spring Boot automatically detects thecompose.ymlfile in the root of the directory and it runs the Docker image for you before the application starts. The Spring Initializer generated the Dockercompose.ymlfile for you. But you don’t want Spring Boot to restart the container each time because PostgreSQL isn’t serverless! Tell Spring Boot to start the container only if it isn’t running. -
configure the chat and embedding models: thevertex embeddingandvertex chatvalues configure which Gemini chat and Gemini embedding models to use from Google Cloud’s Gemini. This example uses two suitable models for the use case. -
initialize the schema in the vector store: configures the app to use PostgreSQL loaded with a plugin that supports thevectortype. Spring AI has an abstraction calledVectorStorewhich handles writing data to various vector stores. This configuration ensures that Spring AI will initialize the storage that’s required to treat PostgreSQL as a vector store. -
database connection parameters:configures the connection to the SQL database. Do you need this, strictly speaking? No. The Docker Compose support in Spring Boot will automatically connect to the SQL database. It can be handy for reference, though.
The Database
You have a SQL database with no data. Imagine! If a database has no data, is it really a database? Or is it just a base? You can get Spring Boot to initialize the database by running some SQL commands and installing some data on startup. Two files will run on startup: src/main/resources/schema.sql and /src/main/resources/data.sql. First, the schema.sql file:
- code_block
- <ListValue: [StructValue([(‘code’, ‘drop table if exists dog;rncreate table if not exists dog(rn id serial primary key,rn name text not null,rn description text not null,rn owner textrn);’), (‘language’, ”), (‘caption’, <wagtail.rich_text.RichText object at 0x3ecd2bb72460>)])]>
Simple enough. It defines a dog table. The src/main/resources/data.sql file gets some dogs in there:
- code_block
- <ListValue: [StructValue([(‘code’, “…rnINSERT INTO dog(id, name, description) values (45, ‘Prancer’, ‘A silly, goofy dog who slobbers all over everyone.’);”), (‘language’, ”), (‘caption’, <wagtail.rich_text.RichText object at 0x3ecd2bb72dc0>)])]>
Nice! The database will be initialized on every restart. This configuration helps to avoid duplicate data by dropping the table on every restart and re-inserting the same rows. If this were a real database, you might use an upsert, which PostgresSQL supports with its insert on conflict... do syntax.
To make short work of building a data access repository and an entity you use Spring Data JDBC. You’ll create an entity called Dog to model and map to the data in the repository.
In the GoogleApplication.java file, following GoogleApplication, add the following lines:
- code_block
- <ListValue: [StructValue([(‘code’, ‘interface DogRepository rn extends ListCrudRepository<Dog, Integer> {}rnrnrecord Dog(@Id int id, String name, String owner, String description) {}’), (‘language’, ”), (‘caption’, <wagtail.rich_text.RichText object at 0x3ecd2bb72610>)])]>
The Assistant
Now for the meat… or the dog bone of the matter, as our pal Prancer might say!
Add Chat clients
First, you build an AssistantController class, by adding the following, again at the end of the GoogleApplication.java file:
- code_block
- <ListValue: [StructValue([(‘code’, ‘@Controllerrn@ResponseBodyrnclass AssistantController {rn private final ChatClient ai;rnrn private final Map<String, PromptChatMemoryAdvisor> advisors = new ConcurrentHashMap<>();rnrn AssistantController(ChatClient.Builder ai) {rn var system = “””rnYou are an AI powered assistant to help people adopt a dog from the adoptionrn agency named Pooch Palace with locations in Mountain View, rnSeoul, Tokyo, Singapore, Paris,rn Mumbai, New Delhi, Barcelona, San Francisco, and London. rnInformation about the dogs availablern will be presented below. If there is no information, then rnreturn a polite response suggesting we\srn don’t have any dogs available.rn “””;rn this.ai = airn .defaultSystem(system)rn .build();rn }rn}’), (‘language’, ”), (‘caption’, <wagtail.rich_text.RichText object at 0x3ecd2de9a790>)])]>
The ChatClient that’s added in the preceding code is your one-stop-shop for all your chat model interactions. It in turn depends on the (autoconfigured) ChatModel that talks to, in this case, Google’s legendary Gemini. You typically only have one ChatModel configured in the application, but you might reasonably have many ChatClients, with different defaults and scenarios configured appropriately. You create a new ChatClient by using the ChatClient.Builder, which the preceding code injects into the constructor.
Set the HTTP endpoint
Next, you set up an HTTP endpoint, /{user}/inquire. When a request comes in, you use a system prompt to ensure that the model acts like it’s an actual employee at our fictitious dog adoption agency, Pooch Palace.
Add the following method to the AssistantController controller class file:
- code_block
- <ListValue: [StructValue([(‘code’, ‘@GetMapping(“/{user}/inquire”)rn String inquire(@PathVariable String user,rn @RequestParam String question) {rn var c = rnMessageWindowChatMemoryrn.builder()rn.chatMemoryRepository(new rnInMemoryChatMemoryRepository()).build();rn var advisor = this.advisorsrn .computeIfAbsent(user, rn_ -> PromptChatMemoryAdvisor.builder(c).build());rn return this.airn .prompt()rn .advisors(advisor)rn .user(question)rn .call()rn .content();rn }’), (‘language’, ”), (‘caption’, <wagtail.rich_text.RichText object at 0x3ecd2de9a760>)])]>
This method defines a PromptChatMemoryAdvisor that keeps track of everything that’s said between a particular user and the model. The method then transmits that transcript to the model on every subsequent request to remind it.
Test the endpoint
Try the following requests out:
- code_block
- <ListValue: [StructValue([(‘code’, ‘http :8080/lee/inquire question==”my name is Lee.”‘), (‘language’, ”), (‘caption’, <wagtail.rich_text.RichText object at 0x3ecd2de9a640>)])]>
and:
- code_block
- <ListValue: [StructValue([(‘code’, ‘http :8080/lee/inquire question==”what’s my name?”‘), (‘language’, ”), (‘caption’, <wagtail.rich_text.RichText object at 0x3ecd2de9a6a0>)])]>
It should confirm that your name is Lee. And it might even try to keep you on track in adopting a dog. Let’s see what else it can do. Ask it:
- code_block
- <ListValue: [StructValue([(‘code’, ‘http :8080/lee/inquire question==”do you have any silly dogs?”‘), (‘language’, ”), (‘caption’, <wagtail.rich_text.RichText object at 0x3ecd2de9ab20>)])]>
It will respond that it doesn’t have any information about dogs in any Pooch Palace location, and it might even encourage you to check the local listings.
Source data
The problem is that it doesn’t have access to the data in the database. We shouldn’t give it all of the data…
We could perhaps give it all of the data. There are only 18 or so records in this particular database. That would fit easily into the token limit for most (if not all?) LLMs. It would certainly fit into a request made to Google’s LLMs large-context window, though.
All LLMs have this concept of tokens – an approximation for the amount of data consumed and produced by an LLM. Google Gemini 2.5 Pro has a very large token size. If you’re using a local model like the open Gemma model, which you can run locally, then the only cost to running a model is the complexity and CPU cost. If you run a hosted model like Gemini, then there’s also a dollars-and-cents cost.
So, even though you could send all of the data along with your request to one of these models, you should try to limit the data that you send. It’s the principle of the thing! Instead, store everything in a vector store and then find things that might be potentially germane to the request, and finally transmit only that data to the model for consideration. This process of sourcing data from a database and then using that date to inform the response that’s produced by a model is called retrieval augmented generation (or RAG).
Add a parameter of type VectorStore vectorStore to the class constructor. You’ll read all of the data from the dog table and then write it all out to the VectorStore implementation that’s backed by PostgreSQL. Add the following to the constructor, at the very top:
- code_block
- <ListValue: [StructValue([(‘code’, ‘if (db.sql(“select count(*) from vector_store”).query(Integer.class).single().equals(0)) {rn repository.findAll().forEach(d -> {rn var dogument = new Document(“id: %s, name: %s, description: %s”.formatted(rn d.id(), d.name(), d.description()rn ));rn vectorStore.add(List.of(dogument));rn });rn}’), (‘language’, ”), (‘caption’, <wagtail.rich_text.RichText object at 0x3ecd2de9a340>)])]>
The only thing to do now is to tell the ChatClient to first consult the VectorStore for relevant data to include in the body of the request to the model. You do this with an advisor. Change the definition of the ChatClient:
- code_block
- <ListValue: [StructValue([(‘code’, ‘this.ai = airn.defaultAdvisors(new QuestionAnswerAdvisor(vectorStore))rn…’), (‘language’, ”), (‘caption’, <wagtail.rich_text.RichText object at 0x3ecd2de9a550>)])]>
Test again and refine the solution
Run the program and ask again:
- code_block
- <ListValue: [StructValue([(‘code’, ‘http :8080/lee/inquire question==”do you have any silly dogs?”‘), (‘language’, ”), (‘caption’, <wagtail.rich_text.RichText object at 0x3ecd2de9a6d0>)])]>
This time, it should respond that indeed there’s a silly dog named Prancer (hi, buddy!) in the shelter who might be just the dog for us!
Well, naturally the next thing you’ll want to do is adopt this dog. But when might you stop by to adopt and pick up this dog? You’ll need to connect your LLM to the patent-pending, class-leading scheduling algorithm.
Add the DogAdoptionsScheduler class to the GoogleApplication.java file:
- code_block
- <ListValue: [StructValue([(‘code’, ‘@Componentrnclass DogAdoptionsScheduler {rnrn @Tool(description = “schedule an appointment to pickup” + rn “or adopt a dog at a Pooch Palace location”)rn String scheduleAppointment(rn @ToolParam(description = “the id of the dog”) String dogId,rn @ToolParam(description = “the name of the dog”) String dogName) rnthrows Exception {rn var i = Instantrn .now()rn .plus(3, ChronoUnit.DAYS)rn .toString();rn System.out.println(“scheduled appointment for ” + i +rn ” for dog ” + dogName + ” with id ” + dogId + “.”);rn return i;rn }rn}’), (‘language’, ”), (‘caption’, <wagtail.rich_text.RichText object at 0x3ecd2de9a460>)])]>
You’ve annotated the method with Spring AI’s @Tool and @ToolParam annotations. These annotations furnish descriptions that the model will use, along with the shape of the methods, to intuit whether they might be of use. You’ll want to tell the model these tools are available, too. Inject the newly defined DogAdoptionScheduler scheduler into the constructor of the controller from the GoogleApplication.java file and then add the following to the definition of the ChatClient:
- code_block
- <ListValue: [StructValue([(‘code’, ‘this.ai = rn …rn .defaultTools(scheduler)’), (‘language’, ”), (‘caption’, <wagtail.rich_text.RichText object at 0x3ecd2de9aeb0>)])]>
Restart the program and try it out. Ask about Prancer again:
- code_block
- <ListValue: [StructValue([(‘code’, ‘http :8080/lee/inquire question==”do you have any silly dogs?”‘), (‘language’, ”), (‘caption’, <wagtail.rich_text.RichText object at 0x3ecd2de9a5e0>)])]>
The response has information now, so then ask how you can get Prancer:
- code_block
- <ListValue: [StructValue([(‘code’, ‘http :8080/lee/inquire question==”fantastic. When can I schedule an appointment to pick up Prancer from the San Francisco location?”‘), (‘language’, ”), (‘caption’, <wagtail.rich_text.RichText object at 0x3ecd2de9a700>)])]>
Did it confirm it’s going to schedule an adoption for three days hence? Congratulations! You successfully have model access to the data and business logic of the service.
Introducing Model Context Protocol
This service is all written in Spring and it uses Spring AI, but of course there are other languages and technology stacks out there, and those stacks might want to leverage this patent-pending, industry-leading scheduling algorithm. You’ll want to extract that functionality and make it a tool that’s available to all interactions with the LLM by using Model Context Protocol. This protocol was first designed by Anthropic and it provides an easy way for any LLM to assimilate tools into their toolbox, no matter what programming language the tools were written in.
Go back to Spring Initializr and set up a new project:
1. Generate a new project named scheduler.
2. Add Spring Web, and MCP Server as dependencies.
3. Choose the latest version of Java and Maven, as before.
4. Unzip the resulting .zip file and open it in your IDE.
5. Transplant (cut and paste for the win!) the DogAdoptionsScheduler component from the google project to the SxchedulerApplication.java file in this new project.
6. Start the new project on a different port; add server.port=8081 to application.properties.
7. Define the following bean in SchedulerApplication:
- code_block
- <ListValue: [StructValue([(‘code’, ‘@BeanrnMethodToolCallbackProvider dogMethodToolCallbackProvider(DogAdoptionsScheduler scheduler) {rn return MethodToolCallbackProviderrn .builder()rn .toolObjects(scheduler)rn .build();’), (‘language’, ”), (‘caption’, <wagtail.rich_text.RichText object at 0x3ecd2de9af40>)])]>
8. Start the application.
9. Return to the assistant and then modify it to work with a remote service instead of the component that it used before.
10. Add the following bean definition to the GoogleApplication.java class:
- code_block
- <ListValue: [StructValue([(‘code’, ‘@BeanrnMcpSyncClient mcpSyncClient() {rn var mcp = McpClientrn .sync( HttpClientSseClientTransport.builder(“http://localhost:8081″).build())rn .build();rn mcp.initialize();rn return mcp;rn }’), (‘language’, ”), (‘caption’, <wagtail.rich_text.RichText object at 0x3ecd2de9a610>)])]>
11. Change the controller of AssistantController to inject a McpSyncClient client instead of the DogAdoptionsScheduler that was there before. Modify the ai definition accordingly:
- code_block
- <ListValue: [StructValue([(‘code’, ‘…rnthis.ai = ai.defaultToolCallbacks(rn new SyncMcpToolCallbackProvider(client))rn…’), (‘language’, ”), (‘caption’, <wagtail.rich_text.RichText object at 0x3ecd2de9a310>)])]>
12. Restart the application and then try the interaction again:
- code_block
- <ListValue: [StructValue([(‘code’, ‘http :8080/dogs/lee/inquire question==”do you have any silly dogs?” rnrnhttp :8080/dogs/lee/inquire question==”fantastic. When can I schedule an appointment to pick up Prancer from the San Francisco location?”‘), (‘language’, ”), (‘caption’, <wagtail.rich_text.RichText object at 0x3ecd2de9a190>)])]>
You should see this time that the model responds basically the same as last time, except that the request was handled in the newly minted scheduler component, not in the google service! We love it when a plan comes together.
Production worthy AI
When you deploy your application to Production, Google Cloud offers two great choices that are compatible with PostgreSQL, both supporting pgVector capabilities. You can use Google Cloud SQL which is basically just PostgreSQL hosted by Google. What else could you need? We reckon, for a lot of use cases, not much! But if you really want superior performance, availability, and scale – then look no further than Google Cloud’s AlloyDB.
AlloyDB is scalable for all sizes and it offers a 99.99% available SLA, inclusive of maintenance. And it’s purpose built for your AI workloads. We’re using PostgreSQL in a Docker image in this example, but when it’s time to deploy, we’re going to spin up an AlloyDB instance.
Codebase
The code for this walkthrough is available in Github.
Next Steps
You’ve just built a production-worthy, AI-ready, Spring AI- and Google-powered application in no time at all. You’ve only begun to scratch the surface! Check out Spring AI 1.0 at the Spring Initializr today and learn more about Google Cloud here.
Resources
Read More for the details.

